Gold Pen Plating Solution

Price range: £83.89 through £138.84 + VAT

Clear selection

We ship this product worldwide – see delivery information

Gold Pen Plating Solution contains 12 grams of gold per litre and we developed it in-house specifically for use with our pen plating equipment.

Use it for selective or ‘spot’ gold plating where you need precise control over the area being plated. Typical applications include jewellery, decorative work and electrical repairs such as PCBs.

The solution produces a gold colour with a slightly redder hue than freshly cast pure gold.

Use our Gold Pen Plating Calculator to calculate the plating time and other settings required for the area and thickness being plated.

Gold concentration: 12 grams per litre

See the Videos tab for examples of Gold Pen Plating Solution being used with our pen plating equipment.

HS Code: 3824 99 70

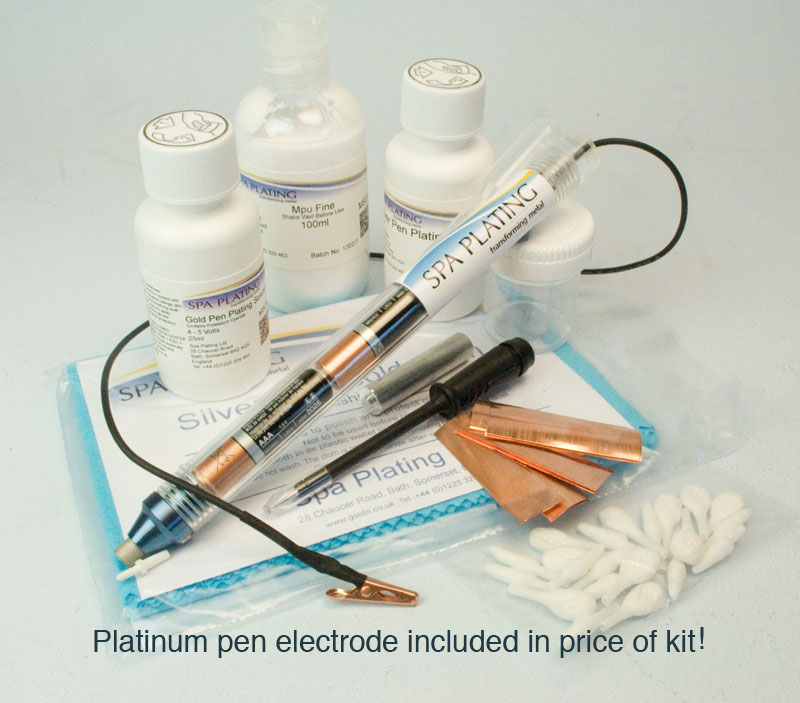
Selective plating with our Gold Pen Plating Solution and our Battery Plating Pen. All our pen plating solutions work equally well with both of our plating pens. For illustrated guides to using our plating pens and solutions, please click HERE to take you through to our Electroplating Manual. To work out how much gold solution you will need and how much it will cost to plate your item, please click HERE for our Gold Pen Plating Calculator.


Our Gold Pen and Brush Plating Kit contains all the accessories you need for gold pen and brush plating. You can also use the kit with our Rhodium Pen Plating Solution.

You can use our gold pen plating solution to spot plate contacts on  PCBs. In this image we are using our battery powered plating pen along with our Mini Contact Probe.

Work out how much pen plating solution you’ll need with our online Pen Plating Calculator – select ‘Gold Pen Plating Solution’ from the drop-down menu.

For more accurate control of gold thickness, use our Coulometer together with the Advanced Gold Pen Plating Calculator. Enter the required thickness, surface area and nib type and the calculator will give you the Coulometer setting, together with the recommended voltage and amount of solution required.

This advanced calculator calculates plating quantity for use with the Coulometer. It cannot be used with a timer.

Here’s how to gold pen plate with our Gold Brush and Pen Plating Kit;

And here’s how to gold pen plate with our battery powered plating pen;

Back to Product Description

Designed for Pen Plating

Gold Pen Plating Solution is ideally suited for use with our MultiPlater and Battery Powered Plating Pen. You can also use it with other suitable pen plating equipment and power supplies.

Pen plating gives you precise control over small areas, making the solution particularly suitable for selective gold plating of jewellery, decorative items, electrical contacts and PCBs.

Gold Concentration

Gold Pen Plating Solution contains 12 grams of gold per litre.

A 25 ml bottle contains 0.300 g of gold and a 50 ml bottle contains 0.600 g of gold.

Gold Colour

The solution produces a gold colour with a slightly redder hue than freshly cast pure gold.

Choosing a Calculator

For straightforward pen plating calculations, use our Pen Plating Calculator and select ‘Gold Pen Plating Solution’ from the drop-down menu.

For more accurate control of gold thickness, use our Coulometer together with the Advanced Gold Pen Plating Calculator. This advanced calculator calculates plating quantity for use with the Coulometer and cannot be used with a timer.

Deposit Thickness and Finishing

Gold Pen Plating Solution produces bright gold deposits when you use the correct nib and operating conditions.

With the Fine Fibre Nib and Fibre Nib, the deposit can begin to lose brightness after approximately 0.5 micron. If you need to build a thicker layer, polish the deposit back regularly with MPU or MPU Coarse before continuing to plate.

Regular intermediate polishing helps you maintain a bright, smooth finish while you build the required thickness.

How to use our Battery Powered Plating Pen

Our Battery Powered Plating Pen is powered by long-life batteries which means it has no need for a separate power source. This makes it completely portable and easy to set up and store. When the batteries run out you can easily replace them - no need to throw the plating pen away and buy another one.
It is ideal for plating small areas such as jewellery and electrical items for example PCBs and electrical connectors on plugs.
It can be used for brush plating as well as pen plating, with the addition of one of our short electrodes and short swabs.
This plating pen can be used with our Rhodium Pen Plating Solution, as well as most of our Coloured Metal Mixers such as rose and green gold.
Because of its relative ease of use and flexibility, it is an excellent choice for those getting started with small scale electroplating.

1. The complete Battery Pen Plating Kit

Each of our Battery Powered Pen Plating Kits include, along with the pen, Gold and Silver Pen Plating Solution, Nibs, MPU, a Beaker, a Mini Contact Probe and Conductor Strips.


2. Preparing the surface of your work for pen plating

The surface of your work must be free of tarnish, oxides, dirt, grease and to be water-break-free to ensure a good plating result. To achieve this, use a little of the MPU on a piece of tissue paper and rub the surface of your work until the metal is shiny and you can see the true colour of the metal clearly. Please click here to see a guide on achieving a water break free surface.

To the right you can view a video of the battery pen being used to gold brush plate on silver clay. The battery pen is multi-functional. With the addition of a short electrode and short swab it can also be used to brush plate. The Battery Powered Brush and Pen Plating Kit includes both pen and brush plating attachments for complete flexibility.

3. Preparing the pen

This is how your pen should look once it is set up. The work is held in one hand and the nib in the other end of the pen (dipped in the gold Pen Plating Solution) is gently stroked over a small area of the surface of your work. This completes the electrical circuit and gold plating takes place.

Note that the ring is not being directly held by the crocodile clip; the electrical circuit is made by the conductor strip (grasped by the crocodile clip) being held in contact with the work. This stops the steel teeth of the crocodile clip scratching the surface of your work.

The next few steps will take you through in detail how to set up your pen.

4. Preparing the plating solution

Measure out the amount of solution you need with your pipette and put it into your beaker. To work out how much plating solution you need, go to our Plating Calculator which you will find on each of our product pages. Just enter in the size of the area you want to plate and how thick you want your plated layer to be and the Calculator will tell you how much plating solution you will need and how long you’ll need to plate. You will then be able to work out in advance how much it will cost to plate your item.

Do not try to dip the pen directly into your bottle of solution as this will mean the next time you want to plate a different item, the solution in your bottle will have a lower concentration of gold and it will take longer for you to achieve a required thickness of gold plate. You will also find it impossible to use the Plating Calculator accurately and you won’t be able to estimate how much it cost to plate the item.


5. Inserting the nib into the anode

Insert a nib into the small hole in the electrode of the pen. Make sure the nib is fully pushed down into this hole and the bottom of the nib is in contact with the anode.

Dip the nib into the pen plating solution. Make sure the nib is fully soaked in the solution, otherwise there won’t be a complete electrical circuit when you come to plate and no plating will take place.

6. Dipping the nib into the pen plating solution

6. Pen plating

Now start pen plating by gently stroking the nib over a small area of your work with regular, circular movements. Keep dipping the nib in the plating solution at frequent intervals to replenish the gold in the nib. Remember to set your timer to the time the Plating Calculator gave you for plating to your required  thickness. You need to have plated the whole of the surface of your work in this time.

Once you have finished plating you can bring out the final lustre of your work and partly protect it from tarnish by applying our MetaSeal with some clean tissue.

7. Rhodium pen plating

As mentioned in the introduction, The Battery Powered Pen Plater can also be used with our Rhodium Pen Plating Solution. A slightly different approach to setting up the pen is required, because of the different composition of the Rhodium Pen Plating Solution and the Fibre Nibs that have to be used with it.

Draw out the required amount of solution from the bottle using a pipette and transfer it into the glass beaker that is supplied with our Batterery Powered Rhodium Pen Plating Kit. Using the tweezers supplied, place the fibre nib into the rhodium solution and let it soak for at least an hour so that the rhodium solution completely permeates into the fibre nib. After an hour, using your tweezers, place the fibre nib into the end of a pen. It is essential to use the tweezers as using gloved hands would cause contamination of the pen plating solution.

9. Functional applications

The Battery Powered Plating Pen is ideal for spot plating of electrical contacts on such items as PCBs and Photomultipliers. To connect the Mini Contact Probe to the black lead coming from the pen, just grip the wide end of the Probe with the crocodile clip.

10. Pen Maintenance

Please click HERE for a guide on how to maintain your battery powered plating pen.

Pen Plating Calculator

How to use this calculator:

  1. In the first box, select the solution you are using.
  2. In the second box, enter the surface area of the item you are plating.
  3. In the third box, enter the thickness you wish to plate to.
  4. In the fourth box, select the type of nib that you are using.
  5. Click ‘Calculate’ to see the volume of solution required and the plating time. The weight of metal plated is also shown. This can be especially useful if you are using accurate scales to check the weight plated and can potentially lead to more accurate measurements.

We have also calibrated some of our solutions for use with the Coulometer, which gives far greater accuracy, especially for pen and brush plating.

For more precise control of plating thickness using the Spa Plating Coulometer, see our
Advanced Gold Pen Plating Calculator.

Operating Conditions and Deposit Data

Voltage Range 4.5 – 7.0 volts
Temperature 14 – 25 °C
Gold Concentration 12g/l
Equipment MultiPlater with a suitable plating pen, or Battery Powered Plating Pen
Electrode / nib Platinum pen electrode with a suitable pen plating nib
Gold content of deposit 99.9% (balance carbon)
Plating Rate at 4.5 volts, Platinum electrode Approx. 0.5 micron per minute (spot)
Hardness 220 – 230 Hv
Density of deposit 19.3 g/cm³
Stress Medium stress
Special storage requirements Away from sunlight
Shelf life 1 – 2 years
Health and Safety classification Harmful
Special considerations Contains potassium cyanide (0.45%)
Transport (UN number) None: Not classified as dangerous for transport

Notes:

  • The quoted spot plating rate applies when the nib remains continuously over the same area. If you move the nib over a larger area, the effective build rate at any one point will be lower.

Delivery information

We ship worldwide, except for products that carry a UN classification for transport.

  • UK courier delivery (FedEx/APC): We use FedEx and APC. Delivery usually takes 2–7 working days from dispatch.
  • Royal Mail: Available for a limited range of non-liquid UK orders. Usually 5-10 working days from dispatch.
  • Free UK mainland delivery: On orders over £200.
  • International delivery: Usually 5-10 working days from dispatch.

Shipping costs: Add the items you require to your shopping cart and click ‘View cart’. Towards the bottom of the cart page, click ‘Calculate shipping’, select your country and enter your postcode. Then click ‘Calculate Shipping Costs’ to see the delivery charge.

VAT, import taxes and duties: For orders delivered outside the UK, we do not charge UK VAT once the delivery country has been selected correctly. Your destination country may charge its own import VAT or other local taxes when the goods arrive. Customs or import duty may also apply, depending on the product and destination. Import VAT and customs duty are separate charges, although the courier or customs authority may collect them together. We do not include these charges in our prices or delivery charges, and you are responsible for paying them.

Please click on the link below to download the SDS for this product:

https://goldn.co.uk/msds/gold_pen_plating_solution.pdf

Fault

Possible cause

Diagnostic clue

Corrective action

No plating at all
Open circuit If you are using a MultiPlater, an open circuit is indicated by a continuous red light. A conventional power supply will show zero amps. Check the workpiece connection, pen electrode and leads. Make sure the nib is fully wetted with plating solution so that electrical contact is maintained. If you are unsure whether the surface itself is electrically conductive, check it with the Conductivity Tester before continuing.
Connections reversed The MultiPlater will still show a green light and a conventional power supply will still show amps. Correct the polarity. Nickel and stainless steel will usually only need to be reactivated. Brass and copper may be etched and will need to be repolished before replating.
Nib not fully wetted with plating solution No current flows if the plating solution does not make contact between the pen electrode and the workpiece. Make sure the nib is fully wetted with Gold Pen Plating Solution.
Trying to plate directly onto a PVD coating Little or no gold may deposit. In some cases irregular swirling or streaked marks can appear across the surface. The nib may also become dark or gold-coloured as tiny particles of the PVD coating detach and collect on it. Do not pen plate directly onto the PVD coating. Remove the PVD coating completely, then prepare and plate the underlying surface.
Trying to plate directly onto a passive or difficult-to-plate metal or alloy Electrical contact is present, but little or no gold plating takes place. Use the appropriate preparation process before gold plating. Nickel, Monel and passive stainless steels may require Gold Strike. Aluminium requires Zincate Dip before the appropriate copper stages.
Platinum coating on the pen electrode completely worn away If you are using a MultiPlater, a continuous red light will show. A conventional power supply will show zero amps even though the electrical connections are sound. Replace the worn pen electrode.
Existing clear coat or E-coating on the surface A continuous clear insulating coating prevents electrical contact with the underlying metal, so no gold plates. With a MultiPlater, the indicator remains red because no current is flowing. The coating can be difficult to see and the underlying surface may still look metallic. Completely remove the clear coat or E-coating to expose the underlying metal, then prepare and activate that metal using the appropriate process before gold plating.
Plating is slow
Gold content of the solution is depleted The solution has been used repeatedly and the plating rate has gradually become slower. Replace with fresh Gold Pen Plating Solution, or increase the voltage gradually within the recommended 4.5–7.0 V range. Stop increasing the voltage if the deposit begins to darken or burn.
Nib is not fully wetted/saturated with plating solution Plating takes place, but more slowly than expected. Make sure the nib is fully wetted and saturated with plating solution throughout the plating process.
Nib is too small for the area being plated The plating is progressing normally and there is good electrical contact, but it is taking a long time to build the required thickness over the whole area. Use a larger nib where practical. Use the Pen Plating Calculator to estimate the amount of solution and plating time required.
Voltage too low There is full electrical contact and plating is taking place normally, but the deposition rate is slower than expected. Increase the voltage gradually within the recommended operating range of 4.5–7.0 V. Stop increasing the voltage if the deposit begins to darken or burn.
Nib is not being kept in consistent contact with the workpiece Plating occurs when the nib is in good contact, but the overall build-up is slower because contact is weak or intermittent during the process. Keep the fully wetted nib in consistent contact with the surface while moving it continuously over the area being plated.
Solution or workpiece is too cold Plating is slower than usual even though the solution, nib and electrical contact are otherwise satisfactory. Allow the solution and workpiece to reach the normal operating temperature range of 14–25 °C before plating.
The expected plating time is shorter than the process actually requires The plating is proceeding normally, but the area is relatively large or a specified thickness is being built and the process simply takes longer than expected. Check the expected plating time using the Pen Plating Calculator for the actual area and thickness required.
High resistance in an electrical connection Plating is unusually slow despite otherwise normal conditions. A poor or partially oxidised connection may become noticeably warm or hot to the touch. Switch off the power and check all electrical connections. Clean or replace any oxidised, loose or damaged contacts before continuing.
Plating is patchy or uneven
Insufficient activation of the surface Gold plates readily on some areas but is reluctant to start, or fails to plate, on others. Reactivate the surface before plating using the preparation method appropriate to the underlying metal.
Surface not properly cleaned Plating is patchy or refuses to deposit in some areas. Oil, grease or other contamination interferes with the plating process and can transfer to the nib. Improve the cleaning process. Wash or replace a contaminated nib before continuing.
Trying to plate directly onto a PVD coating Little or no gold may deposit. Irregular swirling or streaked marks may appear across the surface. The nib may also become dark or gold-coloured as tiny particles of the PVD coating detach and collect on it. Do not pen plate directly onto the PVD coating. Remove the PVD coating completely, then prepare and plate the underlying surface.
Residual brighteners or other strongly adherent residues from previous tank plating The surface has recently been tank plated and the subsequent gold deposits unevenly or refuses to plate properly in some areas. Thoroughly remove residual plating additives before gold plating. Where practical, use MPU before proceeding. Gold should not normally be plated directly onto copper; use a suitable barrier layer first.
Nib contaminated from a previous process The nib is discoloured or has retained foreign material from an earlier process. Wash the nib thoroughly and rinse very well with clean water. Replace the nib if the contamination cannot be removed.
Clear coat or E-coating only partially removed or intermittent Gold plates on exposed areas but not where the insulating coating remains, producing sharply defined or irregular patchy plating. Completely remove all remaining clear coat or E-coating, then prepare and activate the exposed metal before replating.
Deposit becoming dull as the gold thickness builds Some areas appear duller than others even though the gold is plating normally. With the Fine Fibre Nib and Fibre Nib, the deposit can begin to lose brightness above approximately 0.5 micron. The effect becomes more noticeable as the area being plated increases. For larger areas, consider using a larger nib. If the area is becoming impractical for pen plating, use Gold Brush Plating Solution instead.
Deposit is dark/brown/burnt
Voltage too high The gold deposit becomes dark, brown or burnt, particularly on corners, points and other high-current areas. Reduce the plating voltage until a normal gold deposit is obtained. Keep within the recommended operating range of 4.5–7.0 V.
Pen/nib movement too slow Dark or burnt areas develop where the nib dwells too long in one place. Keep the nib moving continuously over the surface and avoid dwelling in one area.
Plating is dull
Underlying surface is dull The gold deposit is sound and uniform, but has approximately the same surface finish as the surface underneath. Polish the surface to the required finish before gold plating. If it has already been plated, carefully polish the gold using the appropriate grade of MPU and replate if necessary.
Deposit thickness becoming too great for the nib The deposit starts bright but becomes progressively duller as the gold builds. With the Fine Fibre Nib and Fibre Nib, this can become noticeable above approximately 0.5 micron. Lightly polish the deposit with MPU or MPU Coarse, rinse thoroughly and continue plating without allowing the surface to dry. For larger areas, consider using a larger nib or changing to Gold Brush Plating Solution.
Brightener depleted with age The solution still plates gold at a normal rate, but the deposit is noticeably less bright than when the solution was fresh. Replace with fresh Gold Pen Plating Solution.
pH too high The solution still plates gold, but the deposit has become dull. Do not attempt to chemically adjust the plating solution. If the gold deposit is sound, the dullness can often be polished out using MPU Coarse or MPU as appropriate. Alternatively, use fresh solution.
Plating fails the adhesive tape test or peels
Existing plating or coating is poorly adhered Examine the underside of the material removed by the tape. Its colour can help identify which plated layer has failed. There may already be signs of blistering, flaking or delamination before gold plating. Remove all loose or poorly adhered plating back to a sound surface before replating. A new gold layer cannot improve the adhesion of an unstable coating underneath it.
Plating directly onto a difficult-to-plate surface or coating Gold may initially appear to plate normally, but fails the adhesive tape test or subsequently peels. This can occur on passive metals and particularly on PVD-coated surfaces. Identify the underlying surface or coating and use the appropriate preparation process before gold plating. PVD coatings should normally be completely removed before plating the underlying surface.
Surface not properly activated, or allowed to dry after activation Gold plates but fails the adhesive tape test or subsequently peels. Reactivate the surface immediately before gold plating. After activation, rinse as required but do not allow the work to dry before plating.
Gold deposit is too thick As the gold deposit becomes thicker, internal stress can eventually reduce adhesion. Avoid building unnecessarily thick deposits. If the deposit has already peeled, remove the poorly adhered gold, prepare and reactivate the surface, and replate to a lower thickness.
Immersion deposit from contaminated process solution A very thin, sometimes virtually invisible, layer of another metal can form on the surface before gold plating. The gold may initially appear satisfactory but later fails because it is adhering to the immersion deposit rather than directly to the prepared surface. Replace the contaminated activator or cleaner, then prepare and reactivate the work before replating. Keep cleaning and activation solutions in good condition and avoid cross-contamination between different metals.
Deposit colour is wrong
Gold deposit is too thin, allowing the underlying metal to influence the colour The colour is incorrect even though the gold is plating normally. This is particularly noticeable when plating directly over silver with very thin gold deposits. Continue plating to increase the gold thickness. As the deposit becomes thicker, the influence of the underlying metal diminishes and the normal Gold Pen colour develops.
Gold solution contaminated with another metal The gold plates normally but develops an unexpected colour. Prevent carry-over between processes. Thoroughly wash nibs and rinse the workpiece between each process. If the Gold Pen solution has become significantly contaminated, replace it.
Incorrect electrode material The gold deposit develops an abnormal colour during plating. Use the correct platinum pen electrode. If the solution has become significantly contaminated, replace the solution before continuing.
Gold coating is extremely thin At extremely low gold thicknesses, the colour of the underlying metal can influence the apparent colour of the finished surface. Continue plating to build a sufficiently thick gold deposit for the normal Gold Pen colour to develop.
Poor coverage
Nib not fully wetted with plating solution Gold plates where good solution contact is made but fails or becomes weak elsewhere. The nib may look wet externally while not being fully saturated around the electrode. Fully saturate the nib with Gold Pen Plating Solution and keep it adequately wetted throughout plating.
Intermittent electrical contact Plating repeatedly starts and stops as the nib moves across the work. With a MultiPlater, the warning beep sounds and the indicator flashes between green and red as electrical contact is lost and restored. Check the workpiece connection and maintain continuous contact between the wetted nib and the workpiece while plating.
Nib too small for the area being plated Individual areas plate normally, but obtaining uniform coverage over the complete area is difficult or excessively slow. Use a larger nib appropriate to the area being plated. Use the Pen Plating Calculator to estimate the plating time.
Speckled plating
Copper migration through the gold deposit The gold initially appears satisfactory but later develops a speckled appearance. Copper from the underlying copper-containing layer migrates upward through the gold by solid-state diffusion. The effect can appear relatively quickly when thicker gold coatings are plated directly over freshly plated copper, and more slowly when plated over copper or copper alloys. Apply a suitable barrier layer between the copper-containing surface and the gold to prevent copper migration.
Scratchy plating
Particulate contamination of the nib Fine scratches appear as the nib passes over the surface, particularly where retained particles are harder than the metal being plated. Replace the nib. Do not continue plating with a nib containing particulate contamination.
Nib stored alongside abrasives Scratching starts immediately with an otherwise apparently clean nib. Replace the nib and store plating nibs separately from abrasives, polishing compounds and other sources of particulate contamination.
Underlying surface already scratched or insufficiently polished The gold follows the existing surface finish and the scratches remain visible after plating. Polish the underlying surface to the required finish before plating.
Incorrect plating thickness
Incorrect plating area estimated or calculated This is a common cause of incorrect plating thickness. The actual area being plated differs from the area used in the calculation. Estimate the total area being plated as accurately as possible and repeat the calculation using the corrected area.
Thickness estimated from appearance The gold appears to have fully covered the surface, but subsequent thickness measurement shows that the deposit is thinner or thicker than required. Use the Pen Plating Calculator rather than judging thickness by appearance.
Plating conditions differ from those assumed by the calculator The calculated plating time has been followed but the measured thickness is consistently high or low. Where accurate thickness is important, verify the result by XRF or deposited weight and use the measured result to establish the actual plating performance under your working conditions.
Coulometer not calibrated to the actual process The required Coulometer reading has been delivered but XRF or weight measurement consistently shows that the resulting thickness differs from the target. For accurate thickness control, use the Coulometer with the Advanced Gold Pen Plating Calculator and establish a calibration factor from an accurately measured deposit. The Advanced Gold Pen Plating Calculator is for use with the Coulometer and cannot be used with a timer.


Preparing the surface for electroplating - creating a water break-free surface

Good surface preparation is one of the most important steps in successful electroplating. In fact, many plating problems occur because the metal surface hasn't been cleaned or prepared properly.

Before you start plating, your aim is to achieve a water break-free surface. This gives your plating solution the best possible chance of producing a sound, well-adhered finish.

The following guidance applies to pen, brush and tank electroplating.

What Is a Water Break-Free Surface?

A water break-free surface is a metal surface that’s completely clean and free from grease, oil and other contamination.

You can check this by holding your item under gently running water.

If the water flows evenly across the surface without forming droplets or pulling away into patches, you’ve achieved a water break-free surface.

However, if the water gathers into droplets or breaks apart, contamination may still be present. You’ll need to repeat the cleaning process before plating.

The photograph of the copper sheet above shows the difference.

On the top half of the copper sheet, contamination causes the water to gather into droplets.

On the bottom half, the water drains away evenly because the surface is clean. This is the water break-free finish you’re aiming for.

Water-break-free

Step 1: Make Sure Your Metal Has the Finish You Want

Before cleaning, check that your item has the surface finish you want to achieve.

Electroplating follows the contours of the underlying metal. Therefore, it won’t hide scratches or turn a matt surface into a highly polished one.

If your item needs polishing, complete this first.

If your work needs a lot of polishing and surface finishing you will need to make sure all of the residue from these processes are completely removed before attempting to electroplate.

For more information, see our guide to Hand and Machine Polishing Metal for Electroplating.

machine polishing

Step 2: Removing Polishing Compounds, Grease and Dirt

If you’ve polished your item with Autosol or used a polishing machine, you’ll need to remove any remaining polishing compounds.

Start by cleaning the surface with a suitable solvent or our MetaPrep.

Next, use liquid detergent to remove any remaining solvent or MetaPrep.

Finally, rinse thoroughly under running water until you’ve removed all traces of detergent.

This initial cleaning stage prepares your item for the final cleaning and activation process.

Step 3: Clean and Activate the Surface

Cleaning removes dirt, grease and oil. Activation removes the oxide layer that can form on metal surfaces.

Some metals, particularly stainless steel, nickel and nickel-containing alloys such as nickel silver, need special attention because of their oxide layers.

Spa Plating offers several ways to clean and activate your work. The best method depends on the metal you’re plating, its size and its surface condition.

For Small and Medium-Sized Items

If your item has a fairly smooth surface and isn’t made from stainless steel, nickel or a nickel-containing alloy, we recommend MPU (MetaPrep Ultra).

MPU removes remaining traces of oil while activating the metal surface at the same time.

Apply it using tissue paper, making sure you treat the whole surface.

For Stainless Steel, Nickel and More Difficult Surfaces

If you’re preparing stainless steel, nickel or nickel-containing alloys, we recommend our ActiClean.

ActiClean cleans and activates the surface in one process.

It’s also a useful choice for very large items or those with uneven surfaces.

For this process, use a Carbon Electrode, preferably, or a Platinum Electrode.

For Tank Plating and Items with Recesses

If you’re preparing items for tank plating, you can use our powered Cleaning Beaker together with our Cleaner. You can use our in-house designed and manufactured MultiPlater to power this stage.

This powered immersion method is particularly useful for items with rough surfaces or recesses.

For example, some surfaces may catch on a cleaning swab, while recessed areas can trap traces of MPU. The Cleaning Beaker provides an alternative way to prepare these items.

Step 4: Check for a Water Break-Free Surface

Once you’ve completed the cleaning and activation process, it’s time for the final check.

Hold your item under gently running water and watch how the water behaves.

If it flows evenly across the surface without forming droplets or breaking apart, your item has passed the water break-free test.

However, if the water gathers into droplets or pulls away from certain areas, repeat the appropriate cleaning steps.

Don’t start plating until you’ve achieved a water break-free surface.

Ready to Start Plating?

Once you’ve achieved a water break-free surface, you’re ready to move on to the appropriate plating process for your metal.

Remember, taking a little extra care during surface preparation can make a considerable difference to your final plating result.

Pen plating on to silver

  • Degrease
  • Rinse
  • Prepare the surface using one of the surface preparation methods detailed in the Notes below
  • Rinse
  • Pen plate with Gold Pen Plating Solution using the conditions recommended by the Pen Plating Calculator
  • Rinse and dry

Pen plating on to nickel and its alloys (such as nickel silver and Monel)

  • Degrease
  • Rinse
  • Prepare the surface using one of the surface preparation methods detailed in the Notes below
  • Rinse
  • Apply a thin layer of Gold Strike
  • Rinse
  • Pen plate with Gold Pen Plating Solution using the conditions recommended by the Pen Plating Calculator
  • Rinse and dry

Pen plating on to less-passive stainless steels

Gold Pen Plating Solution can plate directly on to certain less-passive stainless steels. For more reliable adhesion, particularly where durability is important, apply a thin layer of Gold Strike first.

  • Degrease
  • Rinse
  • Prepare the surface using one of the surface preparation methods detailed in the Notes below
  • Rinse
  • Apply a thin layer of Gold Strike
  • Rinse
  • Pen plate with Gold Pen Plating Solution using the conditions recommended by the Pen Plating Calculator
  • Rinse and dry

Pen plating on to copper, brass and other copper alloys

  • Degrease
  • Rinse
  • Prepare the surface using one of the surface preparation methods detailed in the Notes below
  • Rinse
  • Apply a barrier layer of nickel, silver or palladium. Avoid nickel for items that will have prolonged skin contact because nickel is a common cause of allergic contact dermatitis; use palladium or another suitable nickel-free barrier instead
  • Rinse
  • Pen plate with Gold Pen Plating Solution using the conditions recommended by the Pen Plating Calculator
  • Rinse and dry

Pen plating on to existing gold or solid gold

  • Degrease
  • Rinse
  • Prepare the surface using one of the surface preparation methods detailed in the Notes below
  • Rinse
  • Pen plate with Gold Pen Plating Solution using the conditions recommended by the Pen Plating Calculator
  • Rinse and dry

Pen plating on to aluminium

  • Degrease
  • Rinse
  • Prepare the surface using one of the surface preparation methods detailed in the Notes below
  • Rinse
  • Apply Zincate Dip
  • Rinse
  • Apply a layer of Alkaline Copper
  • Rinse
  • Build up the copper layer using Copper Tank, preferably PP Copper
  • Rinse
  • Apply a suitable barrier layer
  • Rinse
  • Pen plate with Gold Pen Plating Solution using the conditions recommended by the Pen Plating Calculator
  • Rinse and dry

Pen plating on to zinc and zinc alloys

  • Degrease
  • Rinse
  • Prepare the surface using one of the surface preparation methods detailed in the Notes below
  • Rinse
  • Apply a layer of Alkaline Copper
  • Rinse
  • Build up the copper layer using Copper Tank, preferably PP Copper
  • Rinse
  • Apply a suitable barrier layer
  • Rinse
  • Pen plate with Gold Pen Plating Solution using the conditions recommended by the Pen Plating Calculator
  • Rinse and dry

Pen plating directly on to steel and iron

Gold Pen Plating Solution can plate directly on to properly prepared steel and iron. This can be useful for localised decorative work where adding intermediate plated layers is undesirable. Gold plated directly on to steel provides little protection against corrosion because pores in the gold deposit can expose the underlying steel.

  • Degrease
  • Rinse
  • Prepare the surface using one of the surface preparation methods detailed in the Notes below
  • Rinse
  • Pen plate with Gold Pen Plating Solution using the conditions recommended by the Pen Plating Calculator
  • Rinse and dry

Pen plating on to steel and iron where improved corrosion resistance is required

  • Degrease
  • Rinse
  • Prepare the surface using one of the surface preparation methods detailed in the Notes below
  • Rinse
  • Apply a layer of Alkaline Copper
  • Rinse
  • Build up the copper layer using Copper Tank, preferably PP Copper
  • Rinse
  • Apply a suitable barrier layer
  • Rinse
  • Pen plate with Gold Pen Plating Solution using the conditions recommended by the Pen Plating Calculator
  • Rinse and dry

Pen plating on to tin and its alloys (such as pewter, Britannia metal and solder)

  • Degrease
  • Rinse
  • Prepare the surface using one of the surface preparation methods detailed in the Notes below
  • Rinse
  • Apply a layer of Alkaline Copper
  • Rinse
  • Build up the copper layer using Copper Tank, preferably PP Copper
  • Rinse
  • Apply a suitable barrier layer
  • Rinse
  • Pen plate with Gold Pen Plating Solution using the conditions recommended by the Pen Plating Calculator
  • Rinse and dry

Notes – surface preparation

1. MPU – preferred method

After degreasing, use MPU to prepare the surface. MPU combines final cleaning and activation in one process and is our preferred method for most surfaces.

Rinse thoroughly after using MPU and proceed directly to the next stage without allowing the surface to dry.

2. Clean and Activate

Clean the surface with Cleaner, rinse thoroughly, then use Activator where the underlying metal requires activation.

Rinse thoroughly after activation and proceed directly to the next stage without allowing the surface to dry.

3. Acticlean

Use Acticlean as a combined cleaning and activation process.

Rinse thoroughly and proceed directly to the next stage without allowing the surface to dry.

Notes – barrier layers

Copper, brass and other copper alloys require a suitable barrier layer before gold plating. Nickel, silver and palladium can provide suitable barrier layers depending on the application.

For jewellery and other items that will have prolonged contact with the skin, avoid nickel wherever practicable because nickel is a common cause of allergic contact dermatitis. Palladium provides a suitable nickel-free alternative for many applications.

Where a process sequence above specifies a barrier layer after building up copper, choose the barrier metal according to the underlying metal, intended use and required finish.